
How To Build BMX Dirt Jumps
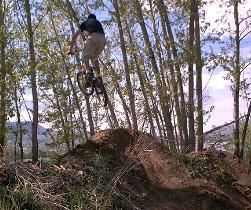 A BMXer getting some big air on a dirt jump | at the Porterspond area Wenatchee Wa 2002| |
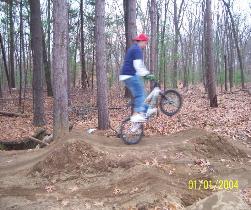 A BMXer ridding some dirt jumps and having lots of fun in year 2004 |
|---|
This is a eazy way for building bmx dirt jumps and trails.Stuff You Will NeedA place to build them relatively flat and big, andhas pretty good dirt not many rocks and shrubs. Shovels & WheelbarrowsYou will need a few spade type shovels and at least one flat edgedshovel for shaping the jumps. You will need a wheelbarrow to move dirt around. Round up some friends, they can push a pretty good amount of dirt around. Designing1. - Plan for the future design what you want to build.Determine what direction you want to go, and where you are going to start. Make sure you have a long enough straight of way, so that your able to pedal fast enough to make the first jump without any problem you may need more space in the initial straight of way to get more speed for the bigger jumps. 2. - Plan to rout your jumps through the trees. Do not start cutting trees down, it is really cool to jump through the trees, and the trees give you shade. Trees also keep the soil intact because of their root systems, and you do not want to cut trees down anyway,unless you have some hatred for nature. So the idea is to build the takeoff lips or the landing lips next to the tree itself, with the pits in between the next set of trees. 3. - What size you want your jump? A 4 foot is a basic average size, do not plan to big for what you can jump. Its better to plan your trails with a variety of sizes. To Start Building1.Make piles of dirt where you want the jumps to be placed.2.Shape your jumps, nice and curved, round, and with no flat spots. 3.Keep curving till you get a nice transition. 4.Make sure they are smooth, no rubble on jump. 5.Shape your landing - twice as long and the take off & it should be twice as wide as the take off. 6.Water down the jump, that is if you have water available. It will dry harder then its original state. The Rundown on How to do it!If you are new to dirt jumps,trying to find a place to learn how to jump can be almost impossible. If you go to most trails, the jumps are so big, so you end up just looking up at them with your jaw wide open then deciding you'd rather just go get a soda pop. Finding a beginers trail is not easy, so like many bmx riders, the only way you are going to learn is if you build it your self. Obviously you need a place to build them that's relatively flat and big has pretty good dirt. The next step is to get or buy the implements you'll need. The most important items of course are the shovels. You will need several spade type shovels, for digging and moving large amounts of dirt, and you will also need at least one flat edged shovel for shaping the jumps. Cheap shovels can be bought at Kmat or Walmart stores for as low as $5.00 though sometimes you may want to pay for the next not so cheap but still cheap shovels that go for about $15.00-$20.00 they will last just a bit longer. Depending on the spot you pick, you may have to move dirt from one spot to another. you will just have to find some friends with good muscles. The best thing though, is to pay for the cheapest wheelbarrow you can find which can be found for about $20.00. Once you have got a good spot to build, shovels, and a few good friends to help, the next step is a plan, and the idea is to plan for the future. Do not build a big double jump in the middle of your spot, because you will find yourself running out of space in no time,and end up building new jumps backwards. Determine what direction you want to go, and where you will start. From there, you will want a long enough straightaway to be able to pedal fast enough to make the first jump without any problem. Keep in mind that if you intend to get serious about dirt jumping, your jumps will get bigger and bigger each time you work on them, So you may need more space in the initial straight of way to get more speed for the bigger jumps. Also note where trees are, assuming there is trees, and plan to rout your jumps through trees. Do not start cutting trees down, for several reasons. First, it is really cool to jump through trees, the trees give you shade, they keep the soil intact because of their root systems and you do not want to cut trees down anyway, unless you have some hatred for nature. Trees are also very helpful as a structural base to support a jump. Note that if you are building through trees, you can not have a pit the area where you land from one jump to the take off of the next jump next to a tree, because of the roots of the tree, so the idea is to build the take off lips or the landing lips next to the tree itself, with the pits in between the next set of trees. Once you have a general plan for what direction your jumps will go, you will need to measure distances so you will know where to start building them. For beginners, the best size double jump is no more than 4 feet high. This may sound crazy, but do not kid yourself, you can break your neck on a 4 foot jump just as easily as on some huge one, and the skills required to jump a 4 footer is the same skills required to jump bigger jumps. Actually, to jump smaller, tighter, more technical jumps, is almost more difficult, for it requires greater precision, hence you'll learn your jumping skills etter. The next measurement is the distance between the lip of the take off jump, and the lip of the landing jump, which for a 4 foot jump, should be about 10 feet you do not need a measuring tape, your feet will work just fine. Now mark where you want the take off lip, the landing lip, and start piling up dirt. Do not try to shape the jumps at this time, your only concern at first is to pile up as much dirt as possible. Even though the jump will only be 4 feet high, you'll be packing down the dirt, so you will need a lot more dirt than 4 feet worth. Make the jump about 4 feet wide, and use the best dirt you can find. Try to keep leaves and twigs out of the dirt, for if you do not the leaves will prevent the dirt from being packed down hard, and will eventually decompose and your jump will fall apart. Obviously you do not want to have rocks in your dirt either, cause, rocks hurt. Even small rocks, which may seem to blend into the dirt when you first build them, will get partially exposed after a few rains, which will be harrden into the jump and stick out when one crashes,like a giant grinder, ready to rip your flesh away. Once you have some really big wide piles of dirt where you want them, start packing them down by walking on them. Still do not concern yourself with shaping them yet, your main concern now is to pack the piles down nice and hard, starting on the top, creating a flat top, and then packing the sides down smacking the sides of the jumps with the back of your shovel helps too. Now that you have created two big packed down piles, your one double jump is starting to take shape. The next step is to shape the take off lip, which is the most critical part of a jump. The shape of the face of the take off jump, is the same as the transition of a ramp. Nice and curved, round, with no flat spots. Take your flat edged shovel, and stand directly in front of the jump, and without moving your position, start carving the face of the jump from the top to the bottom, in nice smooth curved arcs. Be consistant, regular, and create a nice curve. Create the curve, or transition so that it almost goes to vert. In other words, standing from the side of the jump. the top of the lip of the jump should be just short of pointing straight up. It may seem that with the lip so steep, you will not be able to clear the distance, but a little basic physics will prove you wrong, If you roll a ball at speed at your jump, even though the lip almost goes to vertical, you will see that the forward motion of the ball will send the ball arcing quite a distance, which is why you have the landing jump about 10 feet away. This is why it's so important to measure your distances before you start building your jumps. As you are shaping the jump, carefully pack it down by either smacking it with the back of your shovel or having a friend hold you from tipping over, and pack it with your feet, being careful not to mess up the transition with your feet. When it gets pretty much packed down and the shape looks good, you can also use your bikes wheels while sitting on the bike, by rolling it up and down the jump like a big breaddough roller, just be careful not to flatten the very top lip of the jump, keep the transition continuous up to the very lip. Once it looks pretty good, then repack the top of the jump flat, which will lower the jump just a bit, but then you will have a good strong dense jump. The next thing to do is to shape the landing of the jump. This is a lot easier to do, for though you do want a transition curved shape, you don't want it quite as steep, otherwise it'll be too tight, and you'll hang up your rear wheel too easily. Make the landing transition milder, and also make it a little longer, almost twice as long. The landing of the jump should be wide, and well packed down on the edges, so that when a rider goes a bit off course, and in case the landing, it will not get totally destroyed. Now the only other thing left to do, is to water down your jump, that is if you have water available. What makes a jump rock hard is water, allowing the jump to be soaked, and then dried, essentially cements the jump. If you do not have water available, you will just have to wait for some rain. Just remember, do not ride your jumps when they are wet, otherwise you will groove the jump badly with your tires. Of course, you know after all that work you have done to create your first double jump, you are not about to wait for rain, you are going to test it out. Building another jump is, of course, identical to the first jump, except for the shaping of the pit the area between the landing of the first jump and the take off of the another jump. The pit, should be just that, a round curved pit that continues the landing transition down and then up, into the next jumps take off transition. There should be no flat spot in the pit, just a nice curve. By making a pit, you will end up digging below ground level, and because of this, water drainage becomes a problem. There are two ways you can create drainage. One, is to either dig a deep channel, from one side of the pit at the deepest part, and continue that channel far away from your jumps, or dig a short channel, to just a few feet away, to a deep hole. If you use the hole method, make sure you do not dig it too close to the pit, because if you crash into it, say with your feet or hands, you can injure your self way worse than the actual crash, possibly breaking your ankle or wrist in it. Just remember that for every pit, you should have drainage. If you build a jump with a new pit and get too lazy and not build the drainage, and it rains, the next time you come to your trail you will find a deep mud hole. Good luck on building your jumps and have fun in doing so........ Some other nice web sites and pages on "How To Build Dirt Jumps"How to build Dirt Jumps -* www.geocities.com/backtrail01/HTBDJ.html - Archived. Beginners To Building Dirt Jumps - * www.geocities.com/backtrail01/BEGINNERJUMPS.html - Archived. Expert Guide To Building Your Jumps Bigger - * www.geocities.com/backtrail01/EXPERTJUMPS.html - Archived. * Urban Sparks Bicycle BMX Jumps Info Page - ( Seattle, WA ) * PHOTOS - The Trails" BMX 03-19-2006 - ( Unknown Area ) - Archived. Other Web Sites: * www.geocities.com/bmx_2000_xs/buildjumps.htm - Archived. * www.angelfire.com/il2/Bmx/dirt.html * www.mbaction.com/detail.asp?id=775 * www.google.com/Search - How To Build BMX Dirt Jumps How To Build a BMX Race Track See: www.usabmx.com -&- www.uci.org-BMX-Racing-Discover Also Check Out - Gene`s BMX - ( FAQ ) [-022-] How to Build a BMX Track and BMX Dirt Jumps. |
|---|
_______________________________________________________________
***** Gene`s BMX *****
All Things Northwest in BMX!
http://www.genesbmx.com